How to: Windows 10 SSTP VPN setup tutorial
Last updated on March 8th, 2015 in Setup
 We recommend you our HideIPVPN software instead of manual VPN connection.
Setting up HideIPVPN with SSTP access under Windows 10 is again simple. The following instructions go step-by-step through the creation process of a SSTP connection.
Before starting, if don’t have a VPN account you must get it – Get FREE VPN trial account!
Open Network Connections
First, Open Network and Sharing Center from Control Panel. Then choose Set up a new connection or network.

In the next window, choose: Connect to a workplace and click Next.

In the next window, choose Use my Internet Connection (VPN).

Under Internet address type the name of the HideIPVPN SSTP server you want to connect to. You can check the list of SSTP servers under your product details under your client area.
Then enter HideIPVPN VPN as the name of the connection in the Destination name box (you can name it as you want). Then click Create.

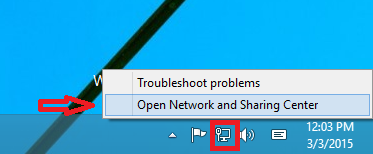
Click on the monitor icon on the bottom right-hand corner. Then Click on “Open Network and Sharing Center”

Select “Change Adapter Settings”

Right click on created connection and select “Properties”

Under Security Tab for Type of VPN select “Secure Socket Tunneling Protocol (SSTP)” and click OK
Tick on “Allow these protocols” then tick on “Microsoft CHAP version 2 (MS-CHAP v2)” and click OK.

Almost done, Click again on the monitor icon on the bottom right-hand corner, find HideIPVPN VPN connection and click connect.
Type your VPN username and password and click OK.

Done, your Windows 8 now should be connected to the VPN server via SSTP protocol.

If you have problems connecting to our VPN server please take a look at our knowledge base before opening trouble ticket.